
Welcome to our EasyCatalog support site.
We help creative designers excel and automate with data driven content.
contact@cunka.com
XML Data Provider Module
|
XML Data Provider Module is an optional module that is NOT included with EasyCatalog. You can purchase this module by contacting 65bit: https://www.65bit.com/software/easycatalog/modules/xml-data-provider/ |
Introduction
The XML Data Provider module enables EasyCatalog to:
-
directly connect to XML files.
-
query the XML file using XPath expressions
-
support character encodings including unicode (UTF-8 and UTF-16)
-
implements XSL Transformation 1.0
-
import JSON file
-
create variables for URL/Xpath usage
| Supports POSIX paths. |
Reference
What is XPath?
XPath (XML Path Language) is a query language for finding information in an XML document.
It is used by the XML Data Provider to navigate through elements and attributes in your XML document.
XPath uses path expressions to select nodes or node-sets in an XML document.
Expression |
Description |
|---|---|
myNodeName |
Select all nodes that have the name myNodeName |
/ |
Select from the root node |
// |
Select nodes from current node that matches the selection |
. |
Select current node |
.. |
Select parent of the current node |
@ |
Select attribute |
[…] |
Check a node value |
text() |
Select the text content of a node |
| |
Union of two node sets |
XPath also includes a number of functions, such as node value comparison, etc.
Reference
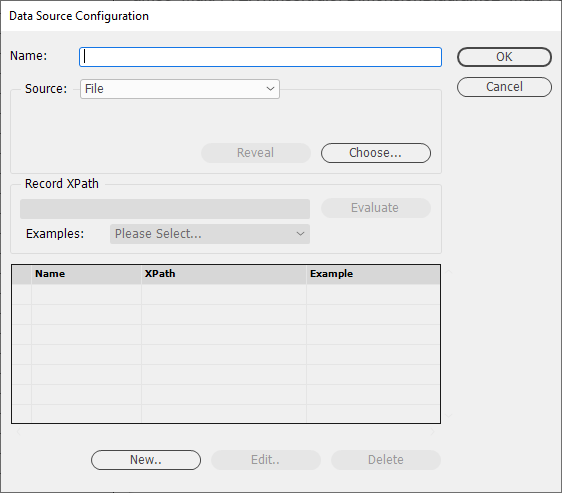
Create from a XML data source
The XML Data Provider module provides an additonal data source type from the InDesign menu.
File → New → EasyCatalog Panel → New XML Data Source…

Example XML configuration
XML source data

| 1 |
<product> The XPath would be: stockcode The XPath would be: |
| 2 |
<category> The XPath would be: |
| 3 |
<section> The XPath would be: |
| 4 |
<price> The XPath would be: |
Step 1 - Select "New XML Data Source…"
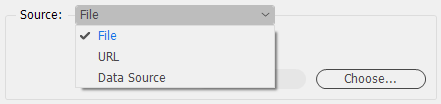
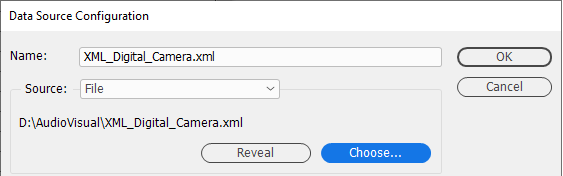
Step 2 - Select the XML data source to use
In this example the XML data source is an existing XML file called XML_Digital_Camera.xml
The Source: is set to File.
Using the Choose button the file XML_Digital_Camera.xml is selected from my PC.
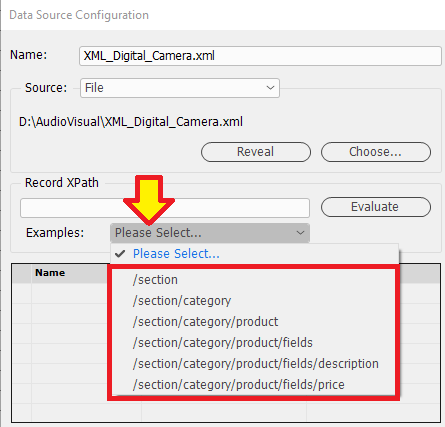
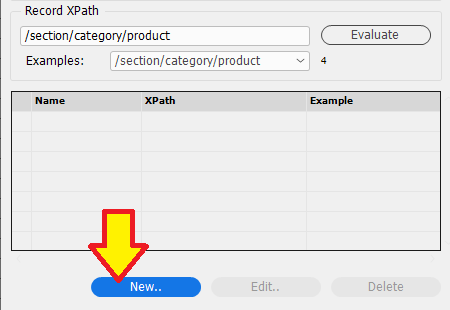
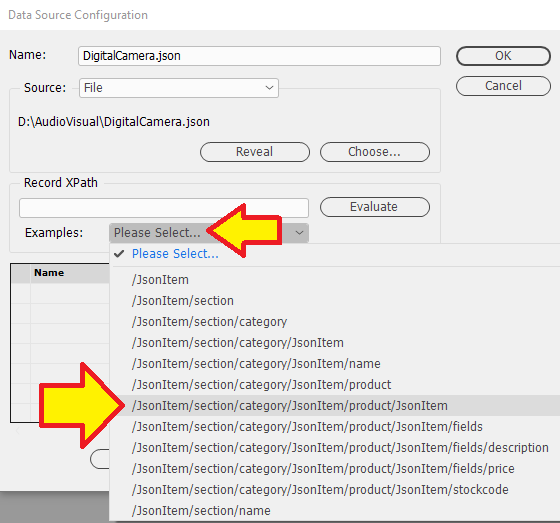
Step 3 - Select the XPath to my products
Using the Examples: dropdown, you will a structure of your XML document.
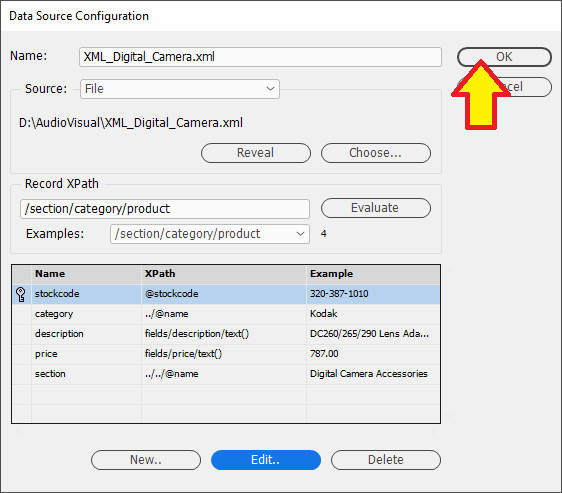
In this particular XML file the products are at /section/category/product.
Step 4 - Evaluate what was found
This step simply will tell you how many <product> elements were found.
In this example after pressing the Evaluate button it found 4.

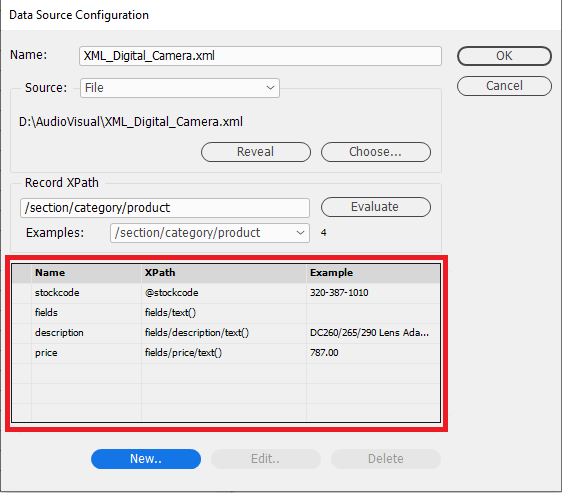
Step 5 - Get all the fields
Press the New button.
Press the Yes button.
A preview appears of the 4 fields found.
What is shown is what it will create an EasyCatalog data source panel for.
From careful observation I can see from the Name column a field called fields that is empty, and there was no fields field in our original data source
However, we will need the category field. So we will repurpose fields to be our category field.
Step 6 - Change fields to category
With the fields selected, press the Edit button.
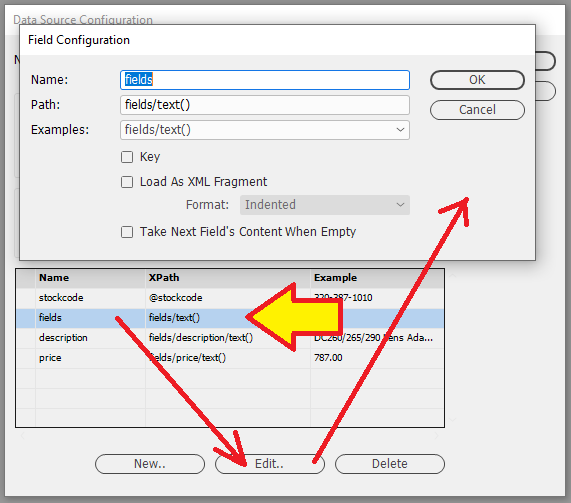
In the Name: text box change fields to category.
In the Path: text box change fields/text() to ../@name
../@name
To retrieve the contents of a parent node, such as the product’s category name , use .. to reference nodes and attributes higher up in the XML hierarchy.
The @name targets the name attribute of the record’s parent node.
In this example the name attribute targeted is in the parent node category.
<category name="Kodak">
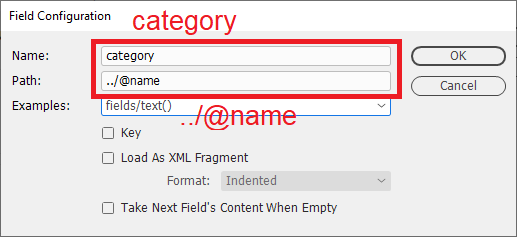
Then press the OK button.
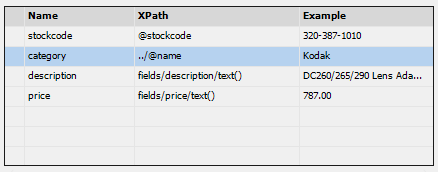
The preview is now updated and shown.
Step 7 - Retrieve another field
There is still one additional field that has not been retrieved, the section field.
The section field has the attribute name that we also require.
<section name="Digital Camera Accessories">
To create a new field configuration, press the new button.
In the Name: text box type in section
In the Path: text box type in ../../@name
../../@name
To retrieve the contents of a grand-parent node, such as the product’s section name , use ../.. to reference nodes and attributes higher up in the XML hierarchy.
The @name targets the name attribute of the record’s parent node.
In this example the name attribute targeted is in the parent node section.
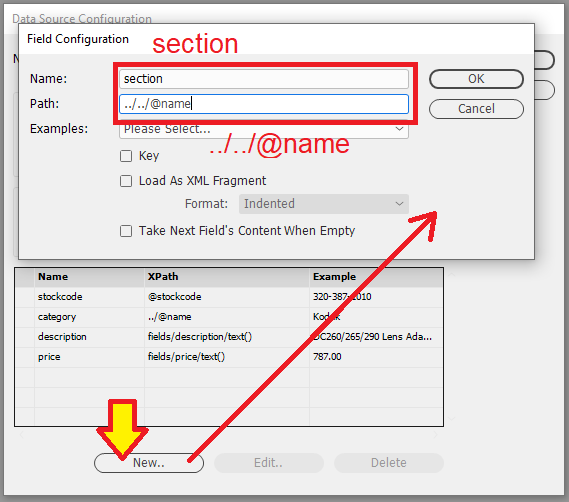
Then press the OK button.
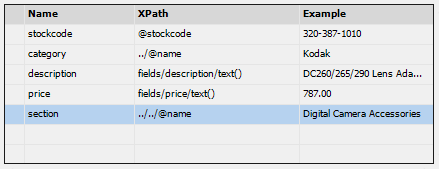
The preview is now updated and shown.
Step 8 - Set the 'key' field
All data source panels require a 'key' field to be set.
In this example, we will use the stockcode field.
With the stockcode field selected, press the Edit button.
Set the Key checkbox to be selected, then press the OK button.
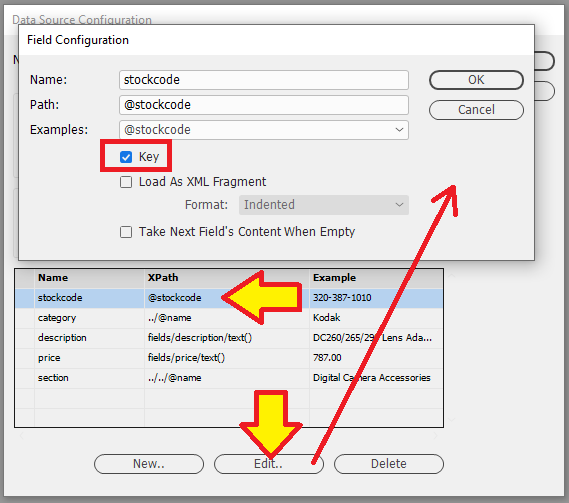
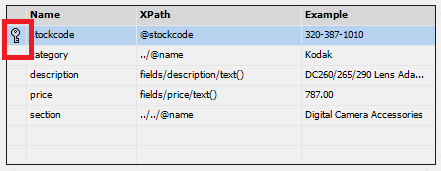
Preview now shows a key icon beside stockcode.
Step 9 - Create the XML data source panel
Press the OK button.
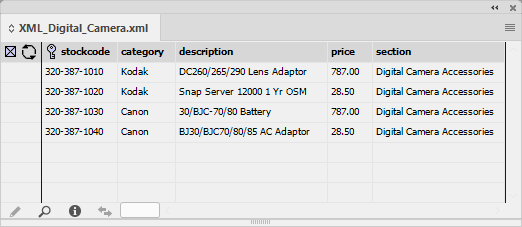
Here is a what the EasyCatalog data source panel looks like.
Load as XML Fragment
A field has the the ability to load part of the XML structure in as content.
(Rather than specifying an individual node or attribute to import).
Use the Load As XML Fragment check box to load the specified node with its children as an XML fragment into the field.
| Using the custom field EVALUATEXPATH (see EVALUATEXPATH) you can extract the contents of the XML fragment. |
Display Formats
There is options that can be selected to display the XML fragment.
The default setting is Indented.
- Flat
-
All fields read from left to right without any space indenting.
<cunka>
<easycatalog>
<name>Brian at cunka.com</name>
</easycatalog>
</cunka>
- Indented
-
Fields are indented.
<cunka>
  <easycatalog>
	<name>Brian at cunka.com</name>
  </easycatalog>
</cunka>
- None
-
Uses the formatting from the supplied XML source.
<cunka>
	  <easycatalog>
		              <name>Brian at cunka.com</name>
  </easycatalog>
</cunka>
Example
Using the same XML used in the "Example XML Configuration" we will create a new field to load a XML fragment from existing XML.
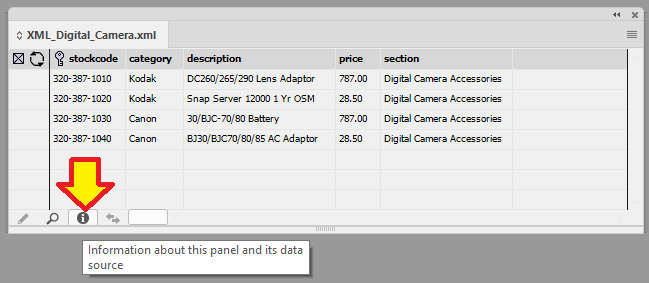
Step 1 - Open the data source panel
Press the information icon on the data source panel.
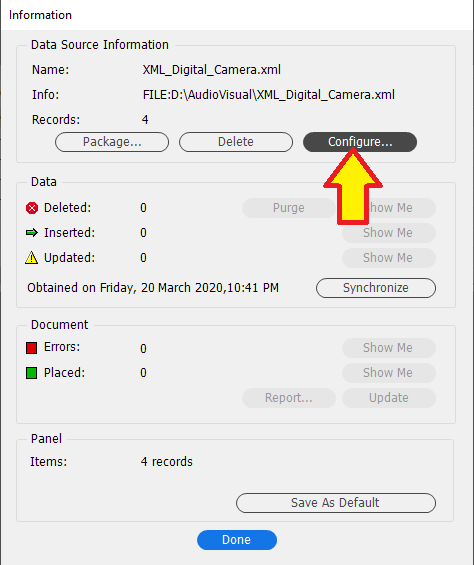
Step 2 - Press the Configure button
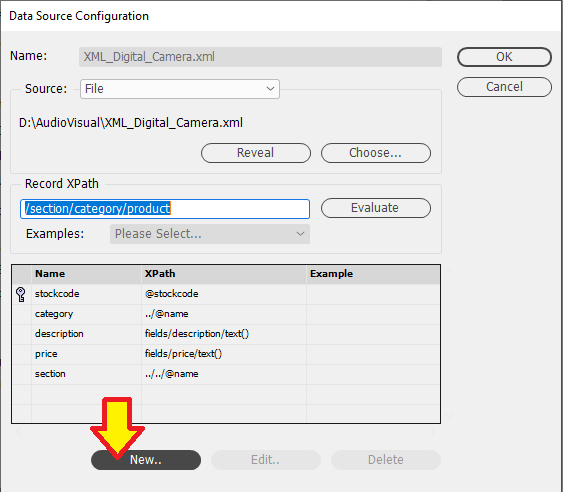
Step 3 - Press the New button
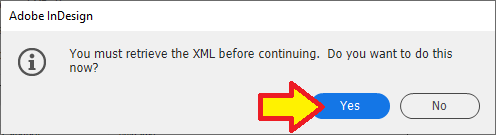
Step 4 - Press the Yes button
Step 5 - Configure the new field product_XML
We will create a new field called product_XML that will be used to laod the XML fragment.
In the Name: text box type in product_XML
In the Path: text box type in //product
//product
Set the Load As XML Fragment checkbox to be selected.
Set the Format dropdown to be Indented.
Press the OK button.

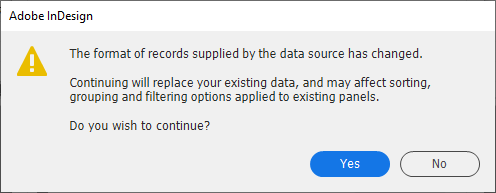
Step 6 - Synchronize the data source
Using the Synchronize button will import the new field product_XML into the data source panel.

Step 7 - Read the dialog box!
|
Data will be lost if you DO NOT UNDERSTAND what you are doing. Do not ignore messages in dialog boxes. Contact 65bit.com Support if you have any questions. |
In this example we will press Yes button.
Step 8 - product_XML field loaded with XML fragment
The new field product_XML appears in the data source panel with contents being that of the XML fragment.
| Hovering over the content may not show the code been indented. |

Reference
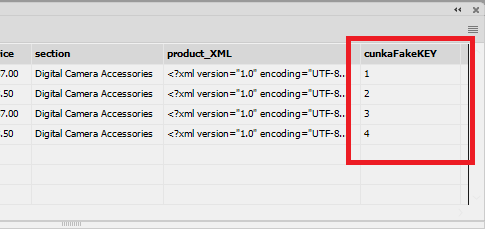
Create a 'fake' key
There may be a situation where you may not have a unique key to work from in your XML source data.
To solve this issue, EasyCatalog allows you to create a fake key field for the data source.
Since the records are all indexed from 1 to however amount of records exist, we can use this index as a counter which makes all our records now unique.
By using [[[INDEX]]] as the Xpath, a unique number is created allowing us to use this as a fake key.
Example Fake Key

"EVALUATEXPATH" command
The XML Data Provider module adds a custom field command EVALUATEXPATH to work with XML fragments.
| See our detailed usage example of EVALUATEXPATH: https://www.cunka.com/easycatalog/myEasyCatalog.html#EVALUATEXPATH |
To retrieve the contents of the given node or attribute from the XML contents of another field:
Parameters
EVALUATEXPATH(field name, xpath, (optional) separator)
Example
EVALUATEXPATH(Laptops, '//Screens/@screensize', ',')
Parameter |
Explanation |
|---|---|
Laptops |
The first parameter specifies the field containing the XML fragment. |
'//Screens/@screensize' |
The second parameter specifies the XPath to resolve. |
',' |
If the XPath retrieves multiple values, they will be separated by the character specified in the third parameter. |
Import a JSON file
JSON data will be identified automatically when importing into the XML Data Provider.
| Hold down the Alt key when loading the JSON file to open a browser window containing the generated XML. |
| It’s not bi-directional: Update Data Source will still only output XML |
Example - DigitalCamera.json file
The DigitalCamera.json file is the exact same data as used in the Example XML configuration section above.
The only difference is the data is in a JSON format, rather than XML.
{
  "section": {
    "category": [
      {
        "product": [
          {
            "fields": {
              "description": "DC260/265/290 Lens Adaptor",
              "price": "787.00"
            },
            "stockcode": "320-387-1010"
          },
          {
            "fields": {
              "description": "Snap Server 12000 1 Yr OSM",
              "price": "28.50"
            },
            "stockcode": "320-387-1020"
          }
        ],
        "name": "Kodak"
      },
      {
        "product": [
          {
            "fields": {
              "description": "30/BJC-70/80 Battery",
              "price": "787.00"
            },
            "stockcode": "320-387-1030"
          },
          {
            "fields": {
              "description": "BJ30/BJC70/80/85 AC Adaptor",
              "price": "28.50"
            },
            "stockcode": "320-387-1040"
          }
        ],
        "name": "Canon"
      }
    ],
    "name": "Digital Camera Accessories"
  }
}

Re-Configuring A Data Source
The configuration for a data source can be modified at anytime using the Information dialog.
Click on the icon at the bottom of the EasyCatalog panel to open the Information dialog.
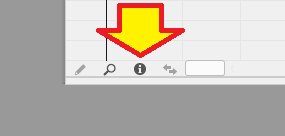
Use the Configure… button to change the settings for the data source.
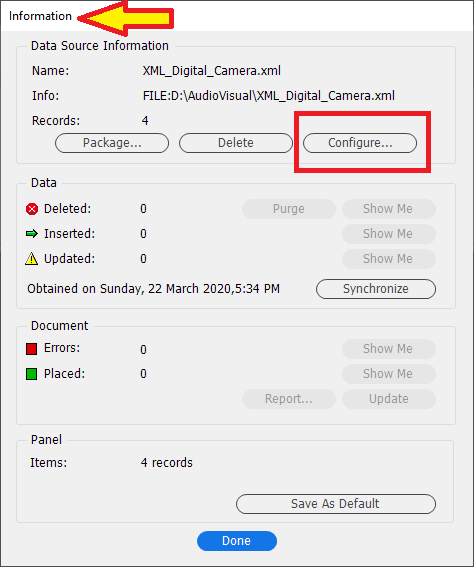
Key Fields
Once a data source has been configured, only the XPath attribute for key fields can be amended.
|
Key fields cannot be renamed or deleted after the initial configuration. This prevents links on your document from being broken by modifying the key fields. |
Updating A Data Source
In the same way file based data sources are updated, EasyCatalog has the ability to update XML data sources.
A snapshot of the XML file is stored when a data source is created or synchronized, so EasyCatalog will only update those nodes that have changed.
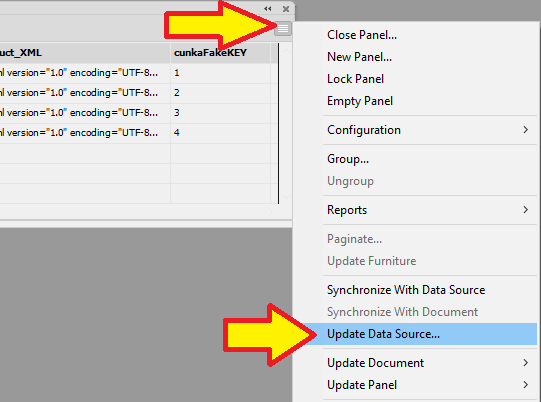
This means any additional information in the XML which is not used by EasyCatalog will be preserved.
Variables
The XML Data Provider module allows the creation of variables for use in URL’s and XPath expressions using the {{NAME}} notation.
The name of the variable sits between the enclosed double braces.
{{...variable name...}}
- Variables can be
-
-
enclosed in double braces and given a name
e.g. {{NAME}}, {{cunkaVariable}}, {{number1}}, {{myXXXX}} -
an alphanumerical value (string)
Must be enclosed within single quotation marks.e.g. 'MY_URL', 'Out Of Stock', 'Sale'
-
a number
e.g. 50, 100, 1000, 0.2
-
used to replace XPath notation
e.g. /bookstore/{{BOOK}}/author
-
| See Example - Source FILE & Example - Source URL to discover how variables are created and updated. |
Why use variables?
Using variables allows you to easily change multiple settings at once, without having to manually edit each setting.
Changing each setting manually can be time consuming and prone to the introduction of errors.
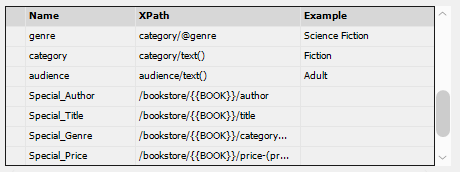
Example - Xpath
In this example we have some created fields (that were not in the original source XML) that show the original XPath, and the result XPath using variables.
The example is trying to grab the first book element using book[1].
It also uses a static value of 0.2 to calculate the discount price on an item.
By substituting variables for book[1] and 0.2, you can do things faster and reduce errors.
- {{BOOK}}
-
Replaces book[1]
- {{DISCOUNT}}
-
Replaces the 0.2 discount number used in the formula
e.g. 0.2 = 20% discount
Field |
XPath (original) |
XPath (with variables) |
|---|---|---|
Special_Author |
|
|
Special_Title |
|
|
Special_Genre |
|
|
Special_Price |
|
|
Example - Source FILE
In his example we will use the CunkaBookStore.xml file to create a new data source panel.
Objective is to create 2 new fields using XPath and use 2 variables in there calculations.
<?xml version="1.0" encoding="UTF-8"?>
<bookstore>
	<book>
	  <title lang="en">Cunka Vision</title>
	  <author>Brian Cowell</author>
	  <formats paperback="true" ebook="true" audiobook="true"/>
	  <code isbn="9333333333333" isbn10="1555555555">CNK-001</code>
	  <price>49.99</price>
	  <category genre="Science Fiction">Fiction</category>
	  <audience>Adult</audience>
	</book>
	<book>
	  <title lang="en">EasyCatalog Manual</title>
	  <author>65bit</author>
	  <formats paperback="true" ebook="false" audiobook="false"/>
	  <code isbn="9111133333333" isbn10="1111115555">CNK-002</code>
	  <price>9.99</price>
	  <category genre="Software">Non-Fiction</category>
	  <audience>General</audience>
	</book>
	<book>
	  <title lang="en">EasyCatalog Automation</title>
	  <author>Brian Cowell</author>
	  <formats paperback="true" ebook="true" audiobook="false"/>
	  <code isbn="9333333399999" isbn10="1555511111">CNK-003</code>
	  <price>59.99</price>
	  <category genre="Software">Education</category>
	  <audience>General</audience>
	</book>
	<book>
	  <title lang="en">Funny Moments</title>
	  <author>Kramer</author>
	  <formats paperback="false" ebook="false" audiobook="true"/>
	  <code isbn="9000000333333" isbn10="1555000000">CNK-004</code>
	  <price>79.99</price>
	  <category genre="Comedy & Humour">Fiction</category>
	  <audience>Adult</audience>
	</book>
</bookstore>
Step 1 - Press the New button
First step will create the first new field.
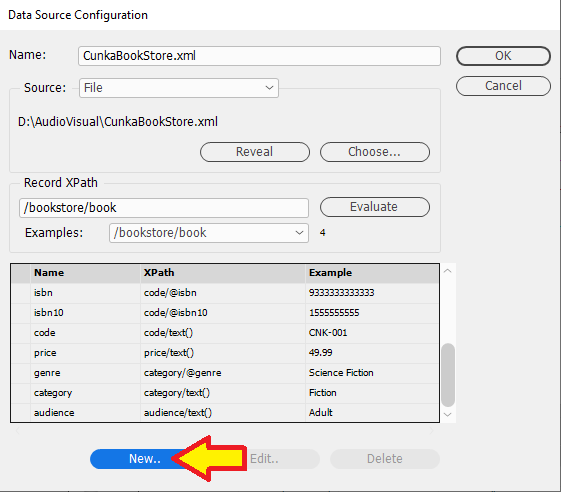
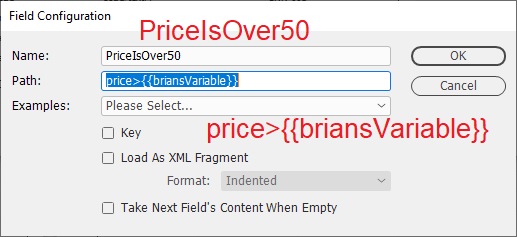
Step 2 - Create a PriceIsOver50 field
This field will return true or false if the price is over the amount of 50.
Set the Name: to PriceIsOver50.
Set the Path: to price>{{briansVariable}}
| We have created the first variable {{briansVariable}} |
Press the OK button
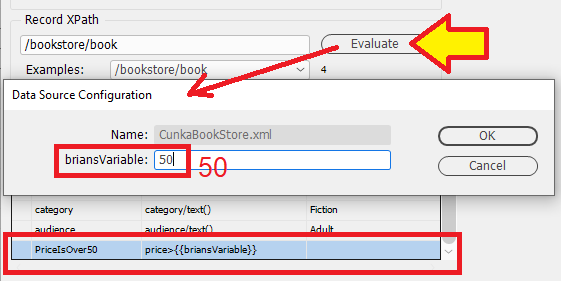
Step 3 - Set the value for {{briansVariable}}
Back at the Data Source Configuration dialog window press the Evaluate button.
It brings up a dialog window where you can now enter the value of 50 into briansVariable:
Press the OK button.
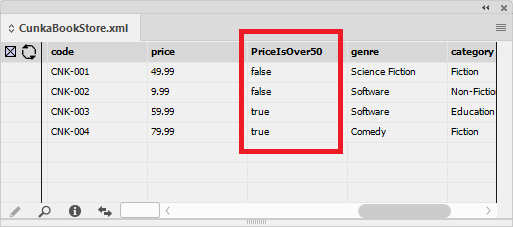
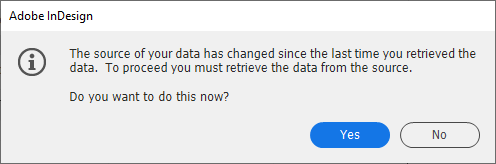
Step 4 - Retrieve the data from the source
This dialog appears to alert the data has changed and must be retrieved again from the xml file.
Press the Yes button.

Step 5 - The data source panel with new field
The PriceIsOver50 field now appears with a true/false value depending whether the price field is over 50.
Step 6 - Variable location
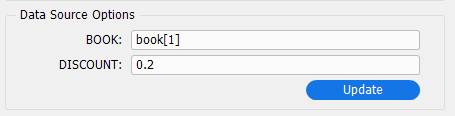
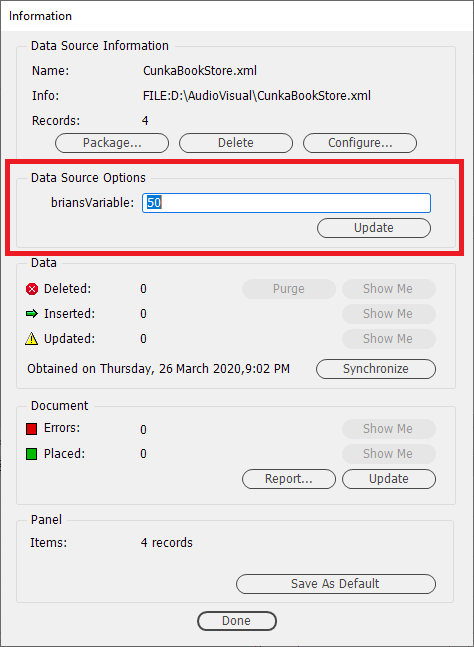
Click on the icon at the bottom of the EasyCatalog panel to open the Information dialog.
Under the Data Source Options you can see where the variable briansVariable is set to 50.
| You can change the settings for variables here anytime and press the Update button. |
Now press the Configure button.
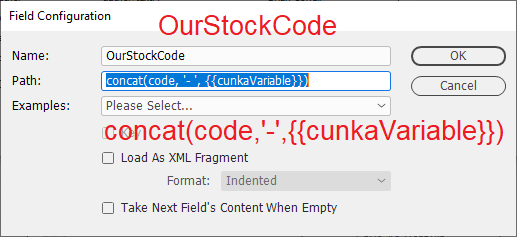
Step 7 - Press the New button
This will create the second new field that will simply create a new code by concatening the code value with our second new variable.
Set the Name: to OurStockCode.
Set the Path: to concat(code,'-',{{cunkaVariable}})
| We have created the second variable {{cunkaVariable}} |
Press the OK button
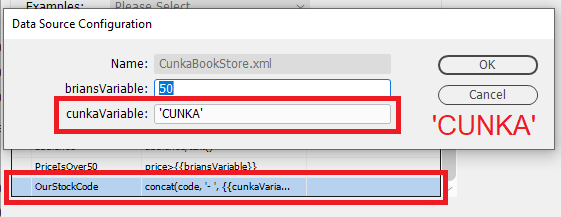
Step 8 - Set the value for {{cunkaVariable}}
Back at the Data Source Configuration dialog window press the Evaluate button.
It brings up a dialog window where you can now enter the value of 'CUNKA' into cunkaVariable:
Press the OK button.
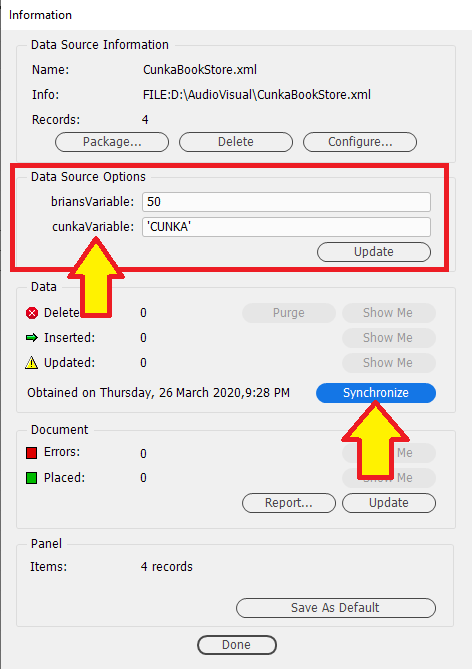
Step 9 - Press the Sychronize button
This will add the new field and update everything.
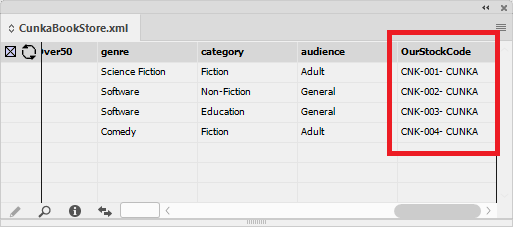
Step 10 - Final result
The new field OurStockCode is now added to the data source panel.
It takes the existing code field and concatenates -CUNKA to the end of it.
Example - Source URL
A variable can be used to stipulate the path to a URL.
In this example we will use a variable called MY_URL to hold the following URL path to an XML file:
https://cunka.com/easycatalog/assets/CunkaBookStore.xml
The notation for the variable is:
{{MY_URL}}
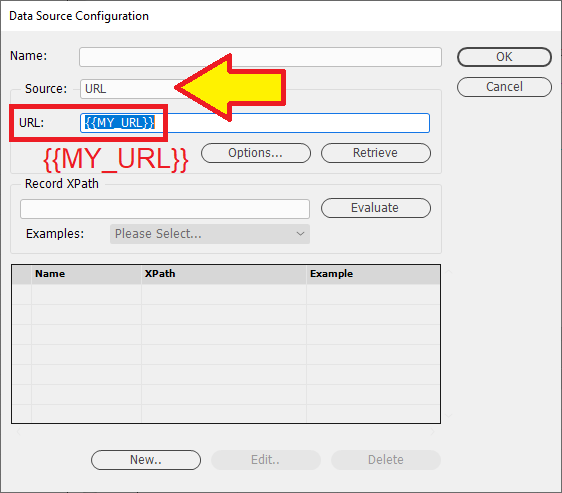
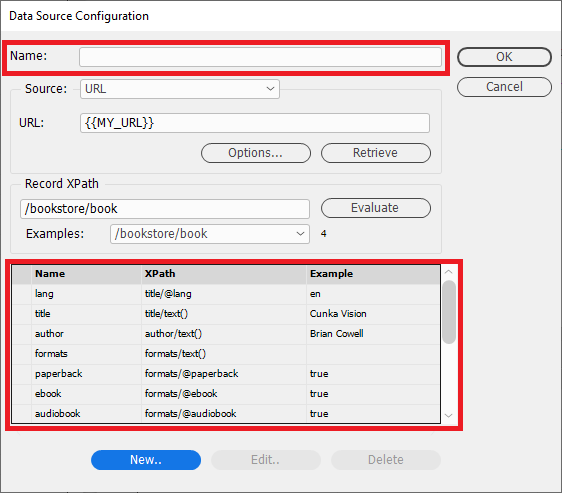
Step 1 - Data Source Configuration
Set the Name: to CunkaBookStore.
Set the Source: to URL.
Set the URL: to our variable name of {{MY_URL}}
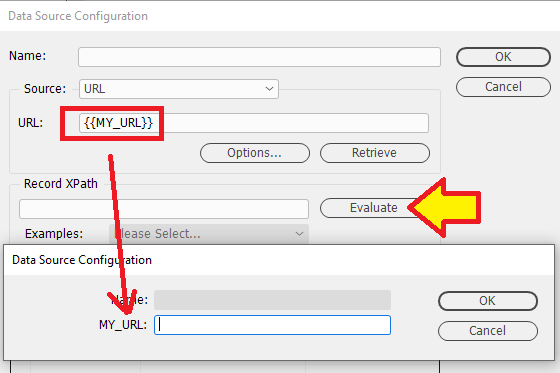
Step 2 - Go to the variable location
Press the Evaluate button
The Data Source Configuration dialog appears.
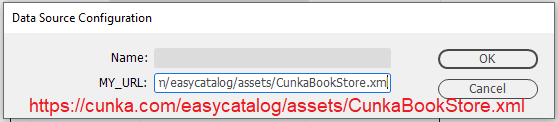
Step 3 - Give the variable a setting
Enter into the variable MY_URL the URL file path:
https://cunka.com/easycatalog/assets/CunkaBookStore.xml
Press the OK button.
Step 4 - Retrieve the data from the source
This dialog appears to alert the data has changed and must be retrieved.
Press the Yes button.
Step 5 - XPath set up
From the Examples: dropdown select where each of the records are located at which is:
/bookstore/book
Press the Evaluate button.
4 should be shown. (4 records found)


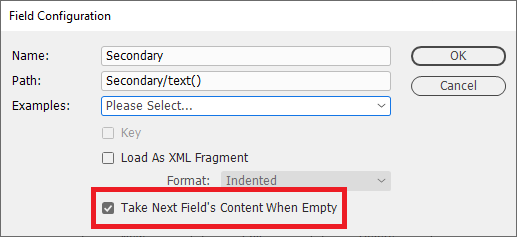
Take Next Field’s Content When Empty
The 'Take Next Field’s Content When Empty' checkbox option allows the easier flattening of hierarchical data.
This checkbox option is available in the Field Configuration dialog box when setting up a fields XPath.
By default, it is un-checked.
Example
The grouping of a data source is set 2 levels deep.
   PRIMARY
      |
      |_________> SECONDARY
If the SECONDARY field is blank, this will affect where the data will appear when paginated which may not be the intention.
To help flatten the data, the contents of the field CATEGORY can be taken and applied into the SECONDARY field by selecting the 'Take Next Field’s Content When Empty' checkbox in the SECONDARY field configuration..
PRIMARY |
Tools |
Tools |
Tools |
Tools |
|---|---|---|---|---|
SECONDARY |
||||
CATEGORY |
Power |
Power |
Hand |
Hand |
SUBCATEGORY |
Drills |
Drills |
Measuring |
Measuring |
RANGE |
Cordless |
Mains Power |
Levels |
Tapes |
PRIMARY |
Tools |
Tools |
Tools |
Tools |
|---|---|---|---|---|
SECONDARY |
Power |
Power |
Hand |
Hand |
CATEGORY |
||||
SUBCATEGORY |
Drills |
Drills |
Measuring |
Measuring |
RANGE |
Cordless |
Mains Power |
Levels |
Tapes |
Getting Help
You can go directly to the creators of EasyCatalog : EasyCatalog Support Page
Brian Cowell can be contacted at contact@cunka.com
©2019-2020 Brian Cowell